Integration guide for developers

Starting with PlusID is easy. You can follow this Integration Guide to start using PlusID services easily in your application or other online service.

Getting started

This document provides a developer integration guide for integrating PlusID services via public REST API. Please note that that API may be updated from time-to-time, but we aim to keep semantic versioning rules in place for the API.

This guide is for PlusID Service Provider API v1.x

If you have any questions, please contact us for technical support at:

We provide support for technical integrations and questions during the normal business hours and working days. Please note that dedicated integration and business support work may require a separate support agreement.

In this guide you will be provided following chapters: 

Principles

The PlusID API is based on REST principles. Although we do not implement them fully in favour of practicality, it has predictable resource-oriented URLs,.

The communication follows standard HTTP response codes and verbs.

The authentication is based on your  own unique API key, which is Service Provider specific and confidential.

Always ensure that your implementation does not over-use, overload and anyway otherwise harm the system and platform.

The development should be done against our staging (test) server, which does not affect the live data or interact with the external services and/or networks. The API key you use to authenticate the request is environment specific.

We will only accept encrypted connections (HTTPS) both for the incoming requests and for the outgoing webhooks.

Once your development is ready, you may want to inform us to get feedback and confirmation about the usage. However, you are always free to start using the API once your Service Provider has been created, reviewed and ID verified.

Base URL for development is:

Base URL for production is:

Authentication

The PlusID API uses API keys to authenticate requests. You can view and manage your API keys in the PlusID Service Provider Dashboard under Settings / API key. API keys may also be provided to you by your PlusID technical representative.

Your API keys define the permissions/privileges for your account, so be sure to keep them secure! Do not share your secret API keys in any publicly accessible areas such as GitHub, client-side code, and so forth.

In the event of a breach or accidental exposure of any of your API keys, please contact us immediately to revoke access to the exposed API keys, or log into your dashboard to remove them and generate new ones.

To authenticate your requests, you need to include the API key into the X-API-Key header, i:e X-API-Key: YOUR_API_KEY

All API requests must be made over HTTPS. Calls made over plain HTTP will fail, always. API requests without authentication will also fail.

Errors

For error reporting, we use standard HTTP response codes to indicate the success or failure of an API request. In general:

  • Codes in the 2xx range indicate success.
  • Codes in the 4xx range indicate an error that failed given the information provided (e.g., a required parameter was missing, payment failed, permission not granted, no access to the data, etc.).
  • Codes in the 5xx range indicate an error with PlusID’s application and/or servers (please inform us about these).


Some 4xx errors may include error code and message to help to determine the issue which allows handling of the error programmatically (e.g. permission to this data is not granted).

Usually for 5xx errors, you can use retries in server-to-server calls with increasing timeouts between retries as they may be caused by network glitch or temporary issue in the server side.

Please note that we will be throttling the number of API request per time. Do not overload or overuse the system!

HTTP Status Code Summary

Pagination

All endpoints that inherently could return a large data set are paginated. Page parameters are:

  • pageNumber: One-based page index. Must be greater than 0.
  • pageSize: The size of the page to be returned. Must be greater than 0 and less than or equal to 100.
  • sort: Sorts the result by a field or a group of fields with the specified direction. If no sort value is specified, then the result will be returned in the database’s natural order.
 
You can see examples of these parameters on our API docs!

NOTE: Some deprecated endpoints, or to be deprecated in the near future, use these parameters instead:

  • page
  • limit

Requests

Please note that in this section, we refer to the PlusID request object and not the HTTP request

Requests are a mechanism that enables the sender to ask an Identity (aka. recipient) for payment or data (private or public), through the use of pay requests and data requests, respectively. It is also possible for the sender to ask the recipient for consent or authorization for specific obligations/requirements through the use of custom items requests.

The sender can create requests and not specify the recipient. In that case, the request will be assigned to the first Identity (user or service provider) to accept it.

If a recipient is specified, then a notification will be sent to that user with a link to access it and respond to it (accept/reject)

In any case, whether the sender specifies the recipient or doesn’t, he can share the URL to the recipient (or potential recipient) so he can access the request manually. Or he can specify, at request creation, a specific email, WhatsApp or SMS using the sendVia parameter. Please check out our API docs to see usage examples of this parameter (#/Requests/postRequest section).

The request resource contains mainly three objects:

  • pay
  • data
  • customItems
 
At least one of these objects has to be present when creating a request, they can stand alone or be combined. Please check out our API docs to see examples of request creation (#/Requests/postRequest section).
 

Pay:

Pay object is used to request a payment from the recipient. Please check out our API docs to see examples of pay requests (#/Requests/postRequest section).

Pre-Authorized Pay Requests:

Pre-authorization is a mechanism used in requests with products/services where the final price is unknown beforehand. In those cases, the sender will create a pre-authorized request with a safe estimated maximum price for those unknown products/services. So when the receiver authorizes the request, that amount will be debited from the recipient’s wallet balance and will be held by PlusID.

After the recipient authorizes the “pre-authorized” request, the sender has 3 options:

1 – Update the request with the final product list. With the restriction that the new “totalGross” must be less or equal than the initial “totalGross” authorized by the recipient. After the request is updated, the held amount will be returned to the recipient and the new “totalGross” amount will be transferred to the sender’s main wallet in a transactional manner. The request status flow will be: 

CREATED → AUTHORIZED → PRE_AUTHORIZATION_DEBITED → PAY_UPDATED → PAID

2 – Cancel the request. In this case, the held amount will be returned to the recipient. No further transactions will be executed. The request status flow will be:

CREATED → AUTHORIZED → PRE_AUTHORIZATION_DEBITED → PRE_AUTHORIZATION_CANCELLED → CANCELLED

3 – Do nothing. In this case, after 48 hours the held amount will be returned to the recipient and then transferred to the sender’s main wallet, automatically, without the intervention of either part. The request status flow will be the same as if the sender updated the request:

CREATED → AUTHORIZED → PRE_AUTHORIZATION_DEBITED  → PAY_UPDATED → PAID

Take a look at the “Request State Diagram” on this page for a complete breakdown of the different request’s status.


Data:

Data object is used to request data from the recipient. All possible pieces of data that can be requested to a recipient are referenced by a dataType. e.g. firstNames, age, driverLicense etc. Please check out DataTypes schema on our API docs ()

For each data request and for each data type, the user needs to provide explicit authorization to share the data with the sender.

Data is fetched in real time, so if the recipient updates the data, that was authorized in a request, if the sender fetches it again it will retrieve the updated values. Also, note that not all data may be available for a specific recipient at a specific time. In such case, the data object returned will contain the status: “not_available”.

Please check out our API docs to see examples of data requests (#/Requests/postRequest section).


CustomItems:

CustomItems are used to request authorization/consent from the recipient to customized pieces of text to which the recipient will respond yes or no. e.g., “Please confirm that you would like to receive promotion emails from us”. All custom items are optional, so the recipient can respond “no” to all of them and still be able to authorize the request.


Request States Diagram:


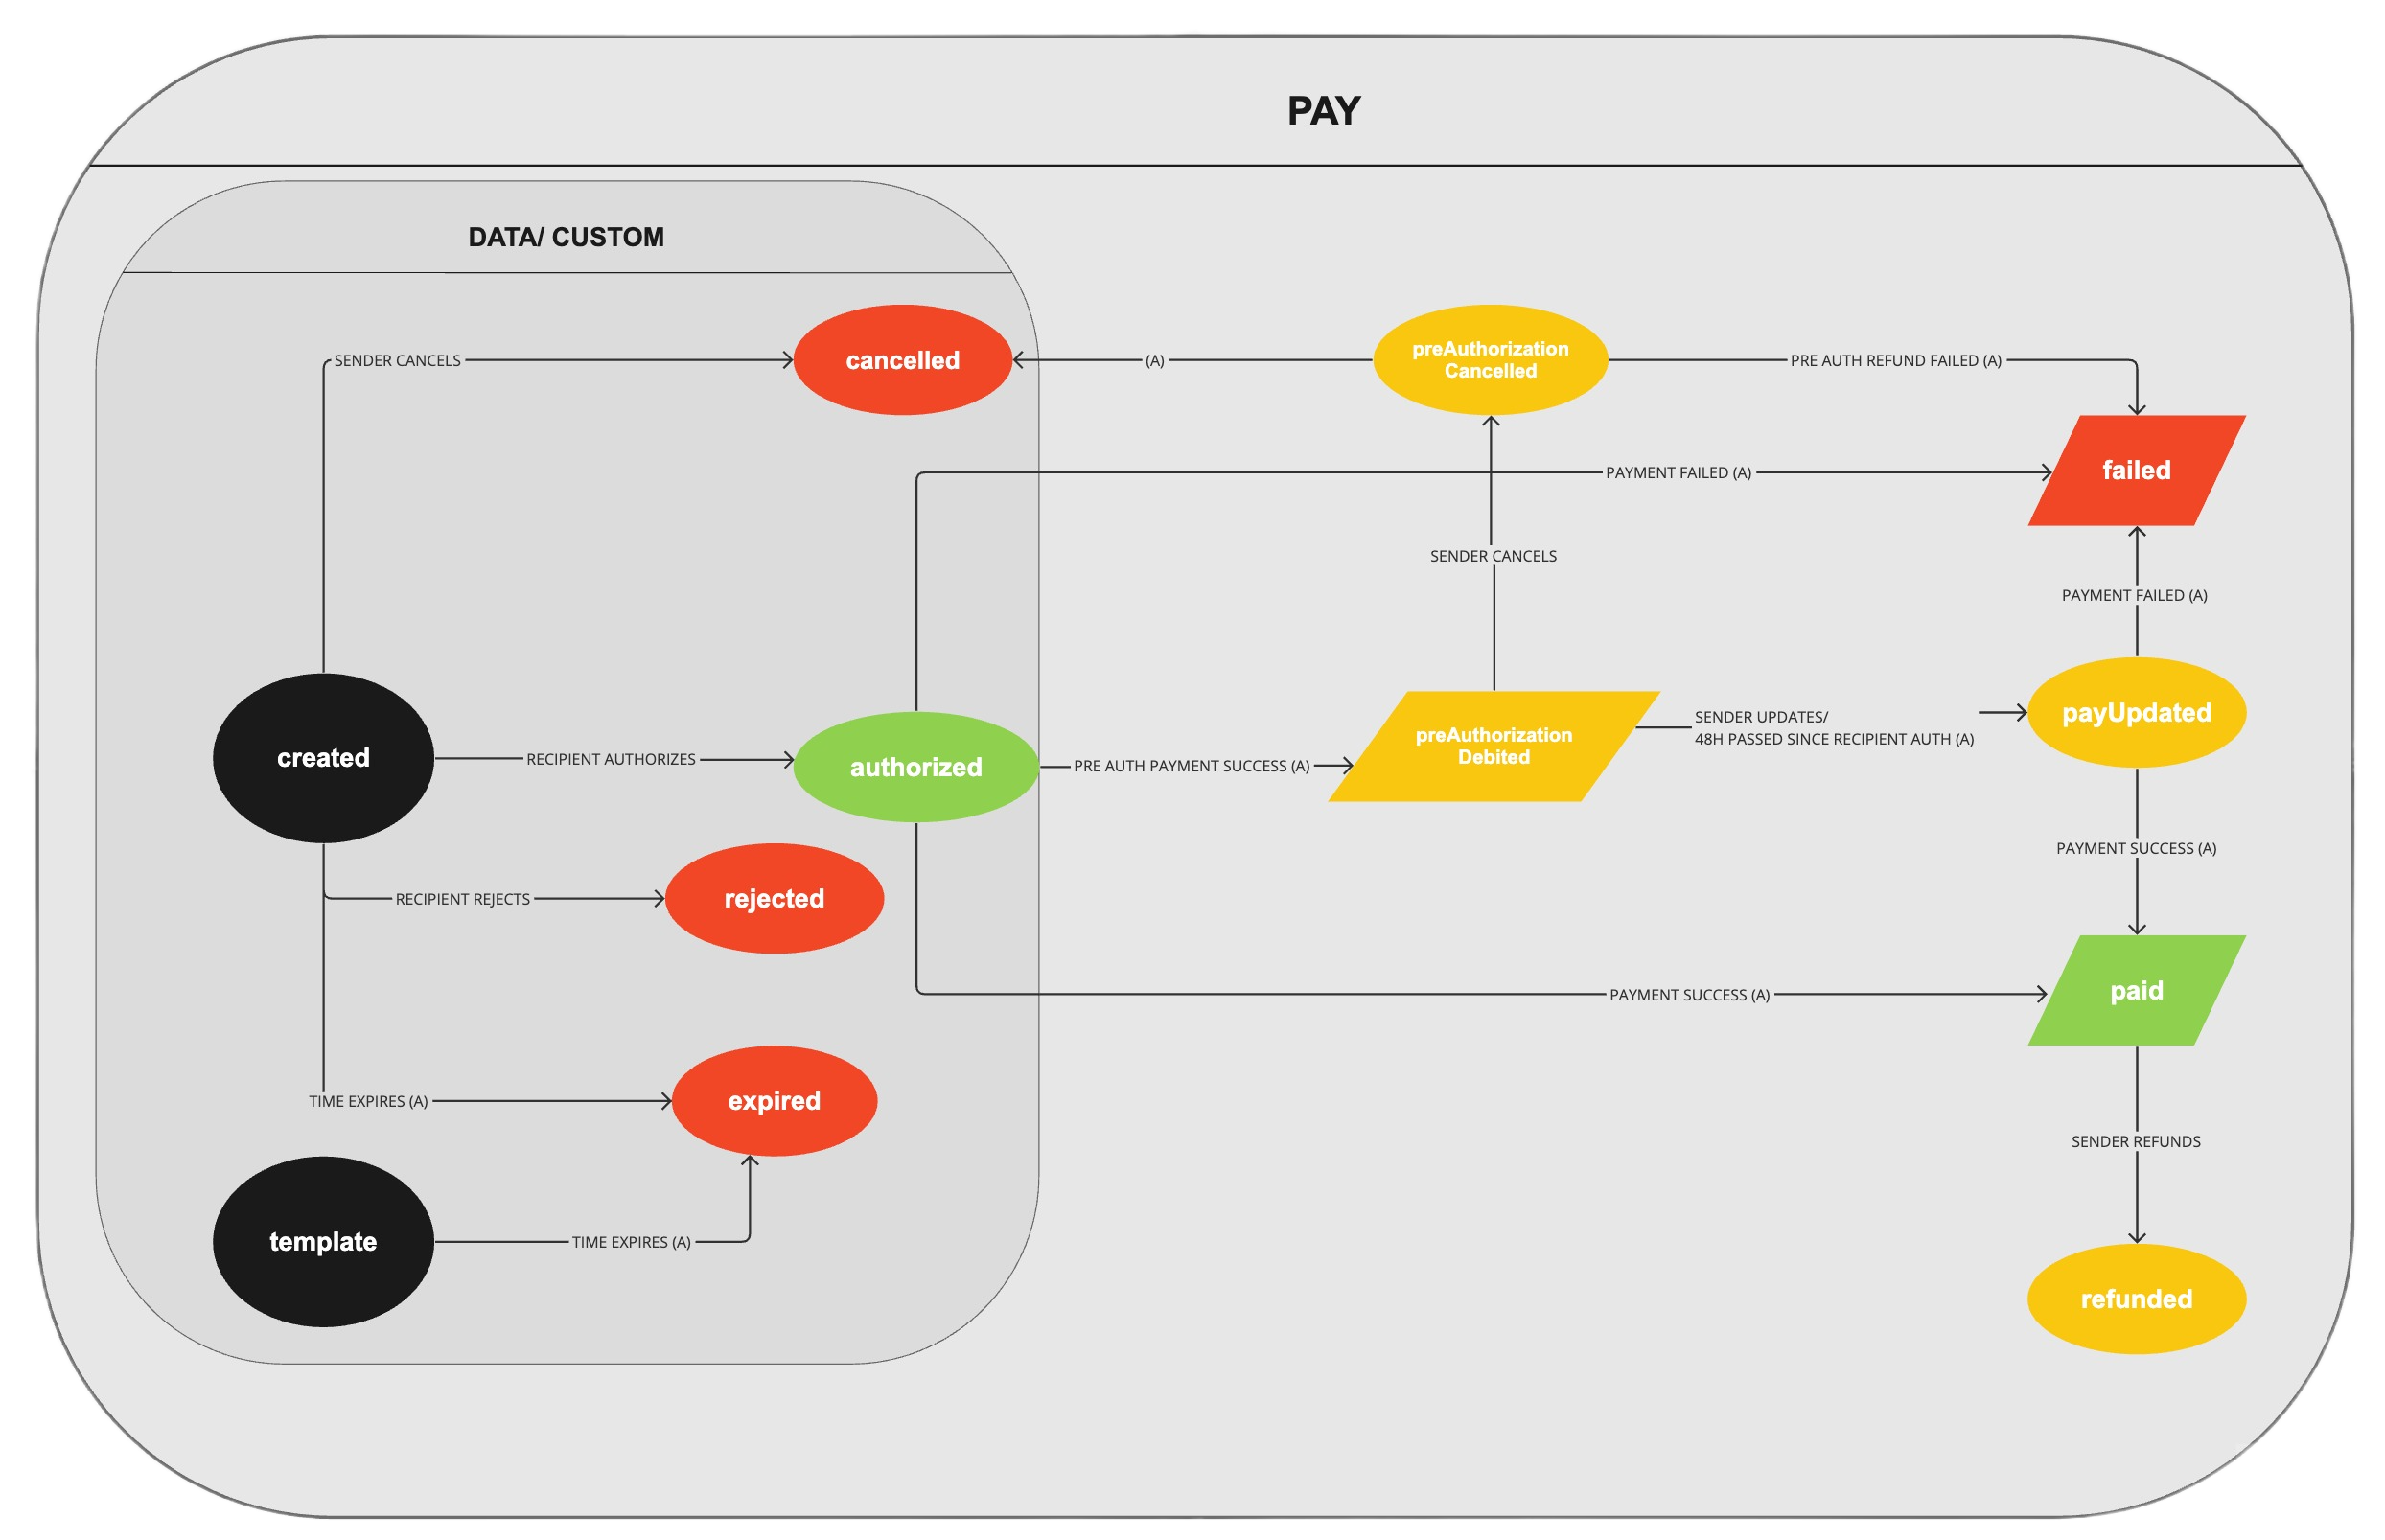
Request States Definitions:

template: The sender has created a template to be used as a base for generating other requests. The next status can only be expired.

created: The sender has created the request. The next status can be expired, cancelled, authorized or rejected.

cancelled: The sender has cancelled the request before the user (recipient) executes an action on it (created). Or has cancelled a pre-authorized payment request (in this case, the transition to cancelled state is automatic). This is always a final status.

authorized: The user (recipient) has authorized the request with a valid PIN code. For data and/or custom requests, this is a final status.

expired: [automatic] This is always a final status.

rejected: The specified recipient has rejected the request. This is always a final status.

preAuthorizationDebited: [automatic]  The pre-authorized payment was debited from the receiver’s wallet successfully, and it is held by PlusId. Next status will be payUpdated or cancelled.

preAuthorizationCancelled: The request has been cancelled by the sender after the pre-authorized payment was debited. Next status will be cancelled once the pre-authorized amount is refunded to the recipient.

payUpdated: The sender has updated the pay request. Next status could be failed or paid.

failed: [automatic] The payment has failed, something went wrong. It will require manual action to review it and fix it. It’s a fail-safe mechanism for when something related to the payment goes wrong. I.e., Even after a pre balance check, at the moment of the payment the recipient has not balance left in the wallet specified in the authorization.

paid:  [automatic] The payment has been processed successfully. This is the final status for a pay request that cannot or will not be refunded.

refunded: The sender has refunded the payment. This is always a final status.

NOTES:

Refunded requests: When a request is refunded, the reintegrated amount transaction is not displayed as part of this request. The request’s final status will always be REFUNDED. The reintegrated amount will appear on the Wallets page as a refund transaction.

Failed PIN code: When a user fails to approve a request because of many wrong PIN code attempts, the request status will always remain as created. Users can be disabled or blocked, but the request status is not affected.

Identities

In the Plus ID universe, an Identity refers to any individual or entity, whether natural or juridical, that interacts with the application.

Types of Identities:

  1. User: A User is a natural person, an individual human being.

  2. Service Provider: A Service Provider is an individual or organization that offers services to other Identities.

Types of Service Providers:

a) Private Service Provider: A Private Service Provider is a natural person who provides services. The identification of a private Service Provider will be the same as the User associated with them, such as their social security number or personal identification number.

b) Company Service Provider: A Company Service Provider is a juridical person, an organization recognized by law, that provides services. A company Service Provider must have a valid company identification.

API Reference

A more detailed Open API v3 (Swagger) specification is available and can be accessed using the button below. You can use this page also to test the API once you have the API key available.

SDK

If you are using NodeJS to do the integration with PlusID API, it is possible to use the following library to even further boost the integration with your solution.

Node API library (github.com/readmeio/api) which will automatically generate an SDK from our API specification. 

Please, if you need support for other platforms, or you need more than one environment, let us know!!. We will be happy to help and provide you more information.

				
					/**
 * This is a simple example to GET and POST a request using the autogenerated SDK from PlusId API specification.
 *
 * You can create more complex requests that contain data, payment and custom components, and more!!!
 * Please check out our api docs to see the specification, with examples, of these endpoints and others.
 */
const plusIdSdk = require('api')(PLUS_ID_API_SPECIFICATION_URL);

async function getRequest (requestId) {
  plusIdSdk.auth(MY_API_KEY);

  const { status, data } = await plusIdSdk.getRequest(requestId);
  console.log('getRequest response:', status, data);
}

async function postDataRequest (recipient, expiresAt, redirectUrl, message, mandatoryData, optionalData, privacyPolicyUrl) {
  plusIdSdk.auth(MY_API_KEY);

  const body = {
    recipient,
    expiresAt,
    redirectUrl,
    message,
    data: {
      mandatory: mandatoryData,
      optional: optionalData,
      privacyPolicyUrl
    }
  };

  const { status, data } = await plusIdSdk.postRequest(body);
  console.log('postDataRequest response:', status, data);
}